Showing posts with label Crafts. Show all posts

Tuesday, February 21, 2012

U is for Up All Night Crafting

Crafts > Laundry

Back in the good ole days when I had cable, I would have a show to watch almost every day of the week. It helps to pass the time during deployments, and gave me little things to look forward to. Thats a roundabout way tellling you, I was watching a hillarious show, Up All Night, and they had an AMAZING wreath on their door. I couldn't find a still shot of it, but its basically a peace sign with metal studs all over it.

So here is my Up All Night inspired wreath that now gracefully adorns our front door. We're so trendy ;)


Instead of purchasing the usual wreath frame from a craft store, I went to the hardware store for almost all the materials for this wreath. A Pinterest tip prompted me to buy pipe insulation for the frame, which costs about $1, compared to $4 or $5 at the craft store. I simply made a circle, then guestimated the 3 inner sections after that. If you measure correctly, they should fit in place like a puzzle without any glue.


I chose to wrap the pieces individually with ribbon, and then assemble them inside of the larger circle. Because of the angles involved, ribbon wrapping the peace sign as a whole might've been a little too complicated.

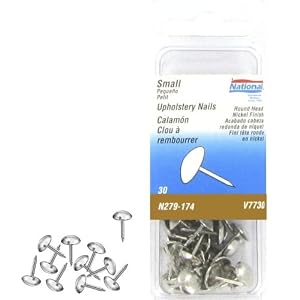
Finally, for the studs, I used, get this, upholstery nails!

They're like thumbtacks with little domes on top, which was perfect! Costs about $1 per package of 25. And here's the finished product! A great everyday wreath for those times in between holidays.


Until next time....

Cheers,

KLM


Wednesday, October 19, 2011

M is for Magnet Mania

So my bestest Megan and I have both started getting quite crafty lately, if I do say so myself. She saw an idea for some photo coasters. You take a plain tile, add a photo to it, spray a sealant over the top, and poof! Personalized coasters! After thinking about it, I was like, welllll that'll scratch the table, so I'd have to get some cork board or felt as well. I prefer to craft, or cook, with as little ingredients as possible. The less random things I have to buy, the better.


I'm not sure if I dreamed it, or thought of it right as I was falling asleep. But I dreamed that I made mini photo coasters, and they were magnets! And now that my gift magnets have been delivered, I can tell you how I made them!


I found 2x2 inch tiles at Lowes. Got a whole sheet of em, 36 or so, for like $3. I picked photos on my computer, put the in a Word document, and adjusted their size to 2x2. It's great to have your own printer, because I don't know many, ok, any, Walgreens that will print a picture exactly 2x2, trust me, I tried.

Cut out the photo. I scored the tiles with scissors, just to make sure the photos would stay stuck. Sorry for my crappy lighting!


If you haven't heard of Mod Podge, then you must be living under a non-craft world rock. People use this stuff for EVERYTHING. It's like decoupage glue stuff. I've never used it, but I know you're supposed to spray a clear acrylic sealant over it, and that's just one more ingredient I would have to buy. *FACT ALERT* Did you know Mod Podge will actually burn through your pictures after an unknown amount of time? At least that's what the craft store lady told me. So she recommended this Glue N' Seal, especially for photos, and you don't have to buy a sealant, because it's built in!

Apply a thin layer to the tile, and stick on your picture. Tip from Kelsey's mistake: Emphasis on the thin, it will wrinkle up if you use too much. Then I flipped the tile over so the weight of the tile helped the photo stick, and let it dry overnight.

The next day, you can take scissors, and some sandpaper (I used a small grit sanding stone), and cut off the excess photo paper. With the sanding stone, you can gently shave the photo down so it's flush with the tile. Such a neat trick if I do say so myself :)  


Next I glued the magnet to the back, so that when I go to add a coat of sealant, I don't seal it to the table. The magnet lifts the tile off the counter so nicely!

Now its time for some sealin! Apply another thin layer to the tile. I was sure to run my sponge brush along all of the edges as well. Don't want the edges to come loose! And whichever way you brush the glue, make sure it's neat and tidy, because you will see faint brush strokes when the glue dries. It starts out cloudy, but dries clear, so don't panic if you can't see your pictures after a coat of glue.

As you can see I didn't follow my own rule on this example tile, and glued the magnet on after I sealed it. Don't worry, it only stuck a little bit! 
 Finished product yay!

I made a whole herd of them for our fridge :) The perfect way to make your fridge personalized, and practical!


Thursday, October 6, 2011

W is for Wreath!

I completed my very first crafty thing. I don't know what brought on my sudden urge to start making a whole bunch of stuff, but it is so fun! Making things with my hands (cooking, painting, crafting) has become a sort of therapy and big way to occupy myself. Ever since this fall super-Seattley weather has hit, I definitely notice the change in my moods. For the last couple days, my brain feels like the sky looks, just kinda grey and "blah." So it's always nice to make something pretty to hang up, and celebrate the season, instead of just hibernating in it.

My inspiration came from a sweet little blog, Twig & Thistle. Until recently, the author was out of commission, but now she's back, and has such cute ideas! The wreath caught my eye because it's so different. You know me, I love love love things that are different, unique, one-of-a-kind. My wreath turned out a little less sweet-looking than Twig&Thistle, but I still like it :)

I bought some fall leaf garland and cut off the leaves rather than buy them individually (There is no Hobby Lobby here, and frankly, Michael's sucks).

And then, I spray painted them with a white primer. There are about 60 leaves here. I only ended up using like half of them though. 

Careful not to spray paint the balcony! As you can see, there was something weird about the primer reacting to the way the leaves were colored, so some yellow showed through, but that was ok, didn't need to be perfect. While they were drying I took ribbon and wrapped the wreath ring (say that 10 times fast!) with a coordinating color of ribbon. Tip #1 discovered by error: Make sure you pull the ribbon tight as you're gluing or pinning it to the ring. Otherwise you get little wrinkles and may run out of ribbon towards the very end!

Once they were dry I divided the leaves into 3 piles, for the 3 shades of purple I would be painting them. Tip #2: Whenever possible, use spray paint! Painting those suckers with a sponge brush took FOREVER. And the coverage was spotty so I ended up "dabbing" them with the sponge for like, a couple hours.

Tip #3: When applying multiple layers/things to a wreath, pins are probably a good idea, so you can move stuff. I hot glued all these puppies down, which was great, until I decided I wanted to move one. Those leaves are strong. So here's my end product, to which I added some festive fall berry things to give it some more fallish color.

Don't mind me and my lack of hanging devices. I had to impromptu-hang it on the kitchen cabinets until I get some sticky hooks for the door, teeheehee. I'll update this post with pictures when the wreath is hanging majestically on the door where it should be! Now be festive and go make your own!